Hi all!
Especially hello to those who subscribe to nine!
So, the idea came up, why not move the fan from the engine compartment somewhere else.
Why move, change what they did at the AvtoVAZ plant?
And all in order to add at least a little free space under the hood. Due to the installation of a 16kl engine, there was very little space under the hood. For minor repairs, you can’t put your hand anywhere...
But what was more stressful was the process of fan operation itself.
Let me remind you that with a carburetor internal combustion engine, the fan was connected to a temperature sensor located on the top of the radiator. Turning on the fan depended on the sensor (90-100 degrees). In my case, the sensor is a classic one, the operating temperature is 90 degrees.
The injector is the work of a fan from the brain (I have a January). There is a temperature sensor on the thermostat, it sends a signal to the brains, and when it reaches the desired temperature, the brains turn on the fan. In general, everything here is clear. But for some reason, switching on from the brain did not always occur at 105 degrees. It happened even higher. It was very annoying in traffic jams. I had to turn the stove on all the way! The antifreeze was boiling... That's why it was decided to rebuild the structure.
I saw the idea of two fans for the front on the Internet a long time ago. Many people buy fans from the new Niva (21213...) or from the Chevrolet Niva, but this is still a little expensive for me. Here is a photo of fans costing over 3000 rubles.
new from Niva
It was decided to weld two fans myself.
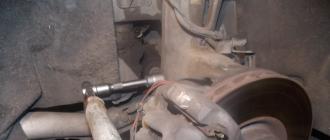
First, remove the old fan along with the box.
I had to struggle with it a little, it wouldn’t come out. It was possible to remove the protection, lift up the muzzle and pull it out from below, but... I simply unscrewed the upper pipe going to the radiator, removed it and pulled the fan up.

What to do with him, what to do?..
...By luck, my friends got me two boxes for a classic fan and the motor itself with blades.
I tried on a box from 2108

box from 2108

as I wrote - from the classics
Box 2103 was made more or less elegantly and is more suitable.
The engines are the same, both on the classic and on the nine - from the VAZ 2103. The blades too.
We remove the blades so that they do not interfere and to paint them. For one thing, we clean the engine from oxidation and lubricate it.
Here's the diagram.
how to disassemble.
Bought poisonous paint. Fluorescent.

Black paint was also found.
There is no need to describe the welding process...
After welding, we try it on the car; the corners and edges of the fan boxes are in the way. We take a grinder and do everything as it suits us.
We try it on, it fits perfectly.
Now we take a drill, a 6.5 drill and drill holes to secure the structure to the TV. Be careful not to damage the radiator!
Next, once everything fits, we paint the structures in several layers.
Oh yes, I had to cut off the mounting lugs for the radiator grille, well they got in the way a little. Then we’ll put a grate, it’s not so important)
Has dried up


TV updated
assemble, install.
It's a matter of electrical wiring.
We will connect the fans in such a way that one works from the sensor on the radiator, the other from the brain.
After asking around, he helped me with the diagram besxes.
I sent you this diagram.
I changed it a little, but in fact, everything remained the way he sent it.
To connect we need:
Pads male/female;
wires;
4-pin relay;
fuse box, wire terminals;
duct tape and a little brain.)))

From the first days of engine creation internal combustion it has one main problem - increased heat generation. This phenomenon is accompanied by overheating of the engine, the service life of which can quickly decrease. If the engine overheats, many parts may become deformed. piston group, damage to oil seals, seals and bearings, as well as ignition of fuel in the fuel supply system.
The first cooling system washed the engine walls with some water. When heated, the water evaporated and “took” some heat from the engine. Later, more advanced, closed engine cooling systems appeared, the effect of which was enhanced with the help of cooling fans.
Initially, the fan was attached to the water pump or. Spinning up, the fan worked constantly and cooled the engine at a given level throughout the entire period of operation. The disadvantage of such a fan is that its rotation does not stop in winter, when warming up the engine takes longer than in summer. Thus, warming up took much longer.
All the shortcomings of pump fans were covered by the electric drive. Electric fans appeared in the second half of the 20th century and greatly improved both cooling and heating the engine to operating temperature.
The design and principle of operation of the VAZ 2109 cooling fan

The fan consists of an electric motor, on the shaft of which there is a wheel with blades and a special casing with fasteners. The casing is designed to mount the fan and has a design that allows the fan to take air only from the front of the car. The casing is made of metal and is attached to the car radiator.
The fan operates only at certain coolant temperatures and does not allow the temperature to rise above normal. When the coolant in the radiator reaches a certain temperature (87 - 90 degrees Celsius), the temperature sensor located on the radiator is triggered and closes the electrical circuit of the cooling fan. The fan starts rotating and cools the engine.
After the temperature drops below the specified levels, the sensor opens and disconnects the electrical circuit of the cooling fan. This cycle continues throughout the fan's operation and ensures reliable engine cooling under normal operating conditions.
Malfunctions and replacement of the cooling fan
The main malfunction of the fan is considered to be its failure to operate. It manifests itself in a rise in coolant temperature above normal. And as soon as they opened the hood, it turned out that the fan was not working.
Troubleshooting begins with checking the sensor. To do this, the wires are pulled out of the sensor and connected to each other (the ignition must be turned on). If the fan starts to rotate, then the problem was in the sensor, if not, then the problem is one hundred percent related to the fan.
Fan failure is usually associated with a malfunction of the electric motor. Only an electrician can repair the electric motor, so in your case, you need to take it for repairs or replace it with a new one. The removal and installation process is described below.
Video - Replacing the VAZ 2114 fan switch sensor
Procedure for replacement
1. Open the hood and disconnect the battery terminal.
2. Disconnect the plug with wires from the connector leading to the fan.
3. Unscrew the fan mounting bolt and remove it.
4. Before installing a new fan, check its operation by connecting directly to the battery. If it works, install it in the reverse order of removal.
This completes the replacement of the cooling fan.
As you know, the cooling fan on the VAZ 2109 performs many functions. Replacing the VAZ 2109 cooling fan is a necessary and important process that can be done on your own.
Causes of fan malfunction
In a VAZ 2109 car, the cooling system fan may make noise during operation. extraneous sounds.
There can be many reasons for this behavior:
- It is possible that the bolt that secures the fan to the engine has simply become loose. Because it doesn't hold up well, it wobbles while riding.
Actually, this leads to the formation of incomprehensible sounds. - The radiator is not installed correctly. That is, he is not in his place. Perhaps it lies on the cross member of the suspension, which is also not very good.
- The fan may have broken on one side, causing an imbalance.
Note: it is not necessary to change it completely. It is enough just to replace the damaged part.
- There is dirt on the impeller. This seems like a complete trifle, but it leads to an imbalance. The result is an incomprehensible tapping sound.

- The cushions are not clamped well, so they do not hold the motor well. The cushions may be compressed (this happens after long-term use). As a result, the motor vibrates.
Note: fix this problem This can be done by replacing the cushions or inserting rubber gaskets.
- If the fan makes a loud noise, it means it lacks lubrication (you need to urgently lubricate the engine with oil).
- The bearing broke. This problem occurs because the impeller has been damaged for a long time, so there is an imbalance in the system.
Note: there is only one way to solve this problem - replace the bearing. However, before this, you need to correct the position of the impeller, since another bearing may soon be damaged due to it.
How to balance an impeller

There are two balancing options:
- The first is to twist a thin wire onto the fan blade. See on which side the imbalance is more pronounced.
Try to align the impeller with a smooth movement until the extraneous sounds disappear. - The second is to insert an axis into the hole, the diameter of which is similar to the diameter of the hole. Install the impeller on two supports located in a horizontal position.
If there is an imbalance, you can get rid of it by grinding a heavier blade, or by gluing a small weight to a blade with less mass.
Note: a regular drill can serve as an axis. The role of two horizontal supports can be performed by two tables.
You can replace the four-blade impeller (this is a standard part) with an eight-blade one.
Note: we cannot say that the latter cool much better than the former, but certainly not worse. Often, after replacing the impeller, extraneous sounds in the cooling fan completely disappear.

On sale you can find both individual impellers and complete with a motor. The latter, naturally, are much more expensive.
Therefore, you should not choose the second option if the motor is working properly (usually it just needs to be lubricated so that it works better).
You should not buy the cheapest impellers. They usually have minor defects.
Note: there are models costing from 100 to 1000 rubles.
How to replace a fan

If replacing the impeller does not help, then you will have to take extreme measures - replace the cooling fan itself.

To do this you need to do the following:
- Open the hood.
- Take off .
Note: After this there will be enough space to carry out further work.
- To easily remove the fan frame, unscrew 2 nuts and 2 bolts (with a 10mm wrench). The two nuts and the first bolt can be unscrewed without difficulty.
However, you will have to tinker with the last bolt. The fact is that it is located in a not very convenient place.
Access to it is hampered by the cross beam and the levers that are attached to it.

- Protrude the impeller. Any convenient tool will do for this.
Note: the impeller itself is very fragile, so work with it should be carried out carefully.
- Using a 13mm socket, unscrew the nut that secures the impeller.
- Under no circumstances should you lose the key that is inserted into the motor shaft. Otherwise, you will have to make something similar to it yourself, and this is not so easy.
- Replace impeller blades.

- Insert it into place (if necessary, you can use a new impeller). The nut needs to be tightened as tightly as possible, because if the impeller dangles, it will soon break again.

- Before you put the fan in place, you need to install two rubber washers. This will ensure that the vibration coming from the fan will be less noticeable.
- To easily put the mount back on the stud, you can make a small slot in the lower mount of the frame.

- Insert the fan. Tighten all the nuts that secure it.
Double fan

In the summer, the “nines” especially overheat. Therefore, in order to ensure the maximum, you can install two instead of one fan.
For this:
- First of all, you need to make another mount for the fan.
- In addition, you also need to make a small hole in the fan itself so that it can be easily installed in place.
- Disassemble the motor and remove the magnets (it is better to use a screwdriver to prevent them from breaking).
Note: it is important not to confuse the order in which the magnets were placed, so they need to be marked.
- Use a grinder to cut off the previous cylinder fasteners and weld new ones in their place.
- Reassemble the motor in reverse order.
- Screw the frame to the motor.
- Install the blades.
- Connect two fans to the blades.
Note: one fan will already be connected (since it is standard). The other can be turned on as needed by making a special button in the cabin.
The cost of repairing a cooling fan at a car dealership is not too high. However, if you do this work yourself, you will have to pay even less.
We must not forget that before this it is worth reviewing various photos and videos on this topic. Perhaps the instructions we offered will also be useful.
Scheme for switching on a VAZ 2109 fan using a relay
It is not difficult to force the VAZ 2109 fan to turn on; you just need to think a little and understand the principle of operation of the entire system. The need to cool the radiator arises when you are driving through traffic jams (and it doesn’t matter at all whether this happens in winter or summer). In hot weather, of course, overheating occurs more strongly.
But when driving for a long time in the starting mode and instantly stopping, the antifreeze in the cooling system simply boils. Today we will look at the reasons why the VAZ 2109 fan does not turn on automatic mode, replacing the temperature sensor, and also drawing up a small diagram forced launch blowing The latter turns out to be useful, since the quality of thermal switches leaves much to be desired.
Why doesn't the electric fan work?
There are not many reasons:
- The motor winding burned out.
- The thermal switch has failed.
- Destruction of electrical wiring.
So, what to do if the fan suddenly stops turning on? First of all, open the heater tap, this will increase the circulation of coolant. Don't forget to turn on the heater radiator fan to help it cool faster.
When the temperature begins to drop slightly, turn off the engine. You open the hood and you see a not very pleasant picture - the antifreeze is gone, half of the compartment is wet. It is necessary to add fluid to expansion tank. If this happens in the summer, then you can add water (the main thing is to change it to antifreeze before winter).
Check the operation of the electric motor - disconnect the connection block and directly supply power from the battery to it. Is the propeller spinning? This means that everything is fine with the winding, put the block in place. On later modifications, only the sensor switch is responsible for turning on the VAZ 2109 fan.
To check it, you need to remove two wires from it and connect them. If the rotor begins to rotate, then the fault lies in the sensor. The way out of this situation is to continue moving by connecting these two wires. There is no need to isolate them, since the activation of the VAZ 2109 fan is controlled by ground (if a bare wire gets caught on a part of the body, then it’s okay).
And the third reason is broken wires. There are two wires to the VAZ 2109 fan sensor: directly from the fan and ground (body). If no problems have arisen before, then try to make a reliable ground, since by default in nines the negative wire from the fan sensor goes towards the fuse box and is lost there.
Find a place near the radiator where you can connect the negative power cable. These are all the malfunctions that may await you. Now it’s worth talking about the useful button for forced airflow.
How to correctly install the VAZ 2109 fan switch button
There are two options - through a relay or using just a switch. The relay connection diagram is simple - you need to connect two wires parallel to the sensor. They both must go to the normally open terminals of the electromagnetic relay. This scheme avoids the presence of high current in the switch.
Two thin wires must be brought out under dashboard and connect to the contacts of the button (or switch). Thus, a control element for the low-current winding of an electromagnetic relay is installed inside the car, and all high-current circuits are located under the hood.
And now, if the VAZ 2109 fan sensor fails, you just need to press a button to cool the engine. For this purpose, a standard relay with normally open contacts is used. Similar ones are installed on light and electric motor drives. Its price in the store is about 50-70 rubles.
The cost of the fan switch sensor is about 100 rubles. As a result, after spending a couple of hundred and half an hour of time, you will create a reliable system that will not let you down in difficult times.
I will say for myself: after it boiled in traffic a couple of times, due to the fan not turning on, I had to install a regular switch and relay. Unfortunately, nothing was found except the heater fan switch from the six, so I installed it. And now, as soon as I approach a jam, I simply turn on the fan. And I turn it off after stopping. This does not affect maneuverability and speed. Even taking into account that the carburetor nine (holds idle 900-930), no jerks or attempts to stall occur.