Depending on the vehicle configuration, various schemes and drive options can be used. auxiliary units.
Belts may vary in size, as auxiliary units such as a power steering pump, alternator, air conditioning compressor may be from different manufacturers.
Therefore, before checking and replacing belts, you need to decide which option suits you.
On the outside of the belts, their size is indicated. You need to buy belts according to their size.
When replacing belts, it is imperative to check the condition of the tension and auxiliary rollers.
Be sure to carry spare belts with you, especially on a long trip. Consider some options and technology for replacing belts.
Insufficient belt tension impairs the circulation of fluid in the cooling system, which leads to engine overheating. In addition, recharging the battery worsens and the belt itself wears out more. Too much tension can damage the water pump and alternator bearings.
Check the tension of the water pump and alternator drive belt from above in the engine compartment.
The tension is characterized by the amount of deflection of the belt between the pulleys of the pump and the crankshaft (deflection " IN") (Fig. 1) or generator and pump pulleys (deflection A) when a force of 98.1 N (10 kgf) is applied in the middle of the distance between the pulleys.
Deflection A should be 10 - 15 mm, deflection IN- 12 - 17 mm.
It is more convenient to check the deflection " A".
To check the tension, you can use a spring balance scale by hooking a branch of the belt with a hook and pulling it up.
Adjust the belt tension on the vehicle mounted on a lift or pit.
Adjustment is carried out by moving the generator relative to the engine.
You will need: key "13", mounting blade.

1. Remove the oil sump guard and engine mudguard.
2. Loosen about one turn the nut securing the generator to the tension bar


4. Move the alternator away from the engine to increase belt tension.
When moving the generator to increase belt tension, apply force only to the generator housing. by placing a mounting spatula between the housing and the motor.

5. To reduce belt tension, move the alternator towards the engine by hand.
6. Without changing the position of the generator, tighten the nut securing the generator to the tension bar and the nut of the lower mounting of the generator.
Tightening torques:
nuts for fastening the generator to the tension bar 28.08-45.3 N m (2.9-4.6 kgcm);
nuts of the lower fastening of the generator 57.3-72 N m (5.95-7.35 kgcm).
7. Install the oil sump guard and engine mudguard in the reverse order of removal.
8. To replace the belt, unscrew the crankshaft position sensor screw and remove the sensor from the bracket socket without disconnecting the wires.
9. Remove the power steering pump drive belt.

10. Follow steps 2 and 3 for adjusting the belt tension and push the generator against the engine until it stops.

11. Remove the belt first from the pump pulley, then from the generator pulleys and crankshaft.
12. Put on a new belt first on the crankshaft pulley, then on the alternator pulley and then on the pump pulley.
If the new belt is tight on the pump pulley and the alternator is pushed all the way to the engine, gently turn the pump pulley by hand or turn it slowly crankshaft until the belt is completely put on the pulley. Ask an assistant to rotate the crankshaft.
13. Follow steps 2-6 for adjusting the belt tension.
14. Reinstall the crankshaft position sensor.

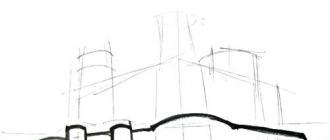
h» under the action of a concentrated load « R
As an option, one V-ribbed belt can be installed on the car, which serves as a drive for all auxiliary units (water pump, generator and power steering pump). In this case, the generator is installed to the left of the engine at the top.
In this case, the belt tension is checked by its deflection between the pulleys of the generator and the water pump. Under normal belt tension, deflection " h" (Fig. 11) under the action of a concentrated load " R» 75 N (7.6 kgf) should be equal to (12 ± 1) mm.
Adjust belt tension by moving tension roller 3, turning the bolt 5 of the tensioner with loose nuts 8 fastening the bracket 4 of the tensioner. After adjustment, turn the engine crankshaft two turns and check the belt tension again.
From the moment of its appearance and at the time of writing the article, all Chevrolet Niva cars were equipped with a single engine model - 2123. This motor it is easy to maintain, almost all elements on it can be changed independently with a minimum set of tools. Belt drives are particularly easy to adjust. They are installed on the generator and other auxiliary elements of the engine, such as air conditioning. Most of them can be changed independently of each other, so the Niva Chevrolet alternator belt with air conditioning changes as easily as on a simpler version.
You must turn off the ignition. After that, open the hood and remove the plastic trim. Then loosen the air duct clamp. To do this, you can use a regular screwdriver.

Then, with a 10 socket wrench, you need to unscrew the screw holding the air filter. After that, remove the air duct from the filter housing. At this stage, the preparation can be considered completed.
Adjustment
To start adjusting the Chevrolet Niva alternator belt, you need to loosen 3 nuts. They don't roll out completely. 1-2 turns are enough to start further work.

The fastener of the adjusting unit is indicated in the image above and marked with an arrow. To carry out this procedure, you need a key for 13.
Adjustment is made with the same key at 13. Turning the screw in the direction of unscrewing occurs loosening, if you turn it in the other direction, tightening, then tension occurs.

Examination.
A correctly tensioned alternator belt on a Chevrolet Niva can be checked by pressing on it at point P, indicated in the figure. With a force of 75N, the allowable deflection should be 1-1.2 centimeters.

It is possible to measure the tension level more accurately only in the conditions of a service station where there is the necessary equipment for this. The same applies to tightening nuts. The manufacturer recommends tightening with a force of 20-25 N * m. For this, a special torque wrench is used.

The need for periodic checks.
The main feature of the Chevrolet Niva engine is that, in addition to the generator, this belt also drives the cooling system pump. If it is weakened, then over time it may slip and, in addition to insufficient voltage generated by the generator, there is a risk of engine overheating as a result of stopping the pump. It also increases the risk of higher wear and tear on the pulleys driven by it due to increased vibration.
An overtightened belt also leads to severe wear on the bearings. In addition, you can notice a whistle when the engine is running, which indicates that it is experiencing strong friction and, as a result, overheats.
Replacing the air conditioner belt.
To change the Chevrolet Niva air conditioner belt, you need to install the car on a flyover or inspection hole. After that, you need to remove the engine protection.

To do this, using a 13 wrench, unscrew 4 bolts around the perimeter.

After that, you can remove the protection of the oil pan.

With a head of 8, we unscrew the screws holding the protection.

Unscrew the front mudguard.

In order to check the tension, you need to press on it with your hand between the compressor and crankshaft pulleys. The permissible deviation should be no more than 0.8 centimeters.

If it is worn out, then proceed to the replacement. To do this, use a socket wrench to loosen the tension roller mounting bolts.

If the air conditioning belt is in good condition, but loose, you need to turn the bolt while tightening, clockwise, this will lead to a stretch.
Replacement is carried out if there are cracks, signs of delamination and breaks on the belt. To change, you need to loosen the bolt, for this you need to rotate it counterclockwise.

After that, it can be easily removed from the pulley. On the Niva, a four-strand, 810 millimeters long, is used to drive the compressor.

The belt is worn so as to be closer to the inner edge of the pulley. Then immediately you need to check its tension.
After installing the part, assemble the components in reverse order.
Replacing the alternator belt Niva Chevrolet is not regulated by any numbers, but the manufacturer clearly stipulates the timing of checking the integrity of the drive belt. It is necessary to check the condition of the alternator belt every 15 thousand kilometers. If the belt is cracked, frayed and oily, it must be replaced. Another reason for replacement may be the “squeal” of the slipping Chevrolet Niva belt, which does not disappear even after adjusting the tension.
If your Chevrolet Niva has air conditioning, then in order to get to the alternator belt you will have to remove the air conditioning compressor drive belt. To do this, we drive the car into a pit or overpass and remove the engine protection. You will also have to remove the front mudguard by unscrewing the screws.
To remove the air conditioning belt on the Chevrolet Niva, loosen the two bolts of the tension roller bracket and loosen the belt tension by turning the adjusting bolt counterclockwise. Look at the picture below.


A loose belt can be easily removed by hand.

After replacing the alternator belt, install the air conditioning belt in reverse order and tension it. To check the belt tension, press the belt with your finger in the middle between the compressor pulleys and the crankshaft. With a pressing force of about 10 kgf, the belt deflection should be about 8.0 mm.
And now let's go back to replace the alternator belt shnivy. To replace the belt, remove the rubber sleeves for supplying air to the throttle assembly. This will make it easy to loosen the tension.
Then, with the “13” head, we loosen the tightening of the three nuts securing the tension roller bracket. With a key or a “13” head, we turn the adjusting bolt counterclockwise, loosening the belt. We remove the belt from the tension roller and other pulleys.


We install a new belt in the reverse order, putting it first on the crankshaft pulley, and lastly on the tension roller. After installation, adjust the belt tension. Scheme of the correct location drive belts on the next photo.

To check the belt tension, press the belt with your finger in the middle between the pulleys of the generator and the coolant pump. With a pressing force of about 8.0 kgf, the belt deflection should be about 12 mm. pulling the belt does not bode well. Not only will the alternator belt wear out quickly, but it will also shorten the life of the bearings of the auxiliary units of your Chevrolet Niva.
The alternator belt must be changed:
- after a run of 40-50 t.km
- if it slips on the pulleys as a result of stretching and / or tightening does not give a positive result
- getting oil on it
The replacement procedure is as follows:
Remove the connector from the DPKV.
Unscrew the M5 bolt with a Phillips screwdriver and pull out the sensor.


Loosen the alternator mounting nut

Pull on the belt to move the alternator as close as possible to the engine block and thereby relieve its tension. If it is not possible to move the generator in this way, you should use the installation.

Jack up the front right wheel. Engage 4th or 5th gear.

With one hand, pull the belt to the right relative to the pump pulley and hold it in this position. With the other hand, rotate the wheel counterclockwise until the belt comes off the pulley. Remove belt.

Throw a new belt on the crankshaft pulley, alternator pulley and partially on the pump pulley. Hold the belt with one hand, rotate the wheel clockwise with the other until the belt is fully seated in the pulley stream.

Take the car off the jack.
Tighten the belt by moving the generator away from the block with a crowbar.
Tighten the alternator mounting nut.
Install DPKV. Screw the mounting bolt and put on the DPKV connector.
After 500 km, check the belt tension and, if necessary, tighten it again.
We carry various brands of cars.
As a result of operation, it may happen that the alternator belt on your car may break or the belt tension may simply loosen. As a result, the circulation of the coolant worsens, thereby overheating the engine. And this, in turn, can lead to the fact that the engine resource will be developed much earlier. In addition, a loose belt will cause accumulator battery will not receive sufficient recharging and may run out of power while running. Well, belt wear is increasing.
But if you tighten the alternator belt on the Chevrolet Niva too much, this also negatively affects the operation of the car. For example, the bearings of the generator and the water pump (pump) fail. Therefore, the alternator belt tension must be carried out as accurately as possible.
On the Chevrolet Niva, the alternator belt is installed according to two principles. The first option is to install a V-belt that relies on three pulleys:
- Generator pulley;
- Pump pulley;
- Crankshaft pulley.
In this case, the tension is carried out by moving the generator relative to the car engine. Of the tools conducting the adjustment, you will need: a mounting blade and a key for “13”.
The adjustment process begins with the removal of the crankcase protection and engine mudguard. After that, you should slightly loosen the nut that secures the generator to the tension bar. It is enough to turn this nut only one turn. After that, it is necessary to loosen the nut of the lower fastening of the generator itself. And depending on the situation, it is necessary to either tighten the alternator belt or loosen it. In the first case, a mounting blade is used. Placing it between the generator and the engine, carefully move the generator away from the engine and tighten the fixing nuts. And to reduce excessive tension, the generator is moved, on the contrary, closer to the engine. To do this, just move it with your hand.
If the adjustment is carried out on your own, then the correctness of the adjustment can be checked using a balance scale by applying a force of 98.1 N (10 kgf). We hook the belt between the generator pulley and the pump pulley with a hook and pull it up a little. The belt should bend no more than 10-15 mm.
In the second option, a V-ribbed belt is installed on the car, which will serve as a drive for all units. In this case, the generator is installed on the left and at the top of the engine. Adjustment is made by moving a special tension roller. Its movement is made by rotating the tensioner bolt. After the adjustment is considered complete, it is necessary to turn the crankshaft two turns and check the belt tension in the segment between the generator pulley and the pump pulley.