But very often you have to sweat - the main difficulty in dismantling old rods.
How to remove the old jet thrust VAZ 2107
Very often, not all traction is changed, but only rubber and metal bushings, but these works are a little more difficult - it is easier to change the old traction to a new assembly.
They put the car on a pit or overpass, fix it. They clean the attachment points and the rods themselves from dirt (a regular metal brush plus a rag). Fill all threaded connections with WD-40 and let them “turn off” (sometimes it helps).
You can unscrew the rod from the side of the body using two 19 keys. To facilitate the process, a pipe is sometimes used on a key to increase the lever. Some people use a hammer and chisel to move the nut out of place - it all depends on the situation. But most often the connection sticks tightly and these “rough”, but effective methods are used. Then the bolt is knocked out, the traction is removed along with rubber and metal bushings.
Removing traction from the side of the bridge is more difficult. It is often not possible to unscrew the bolt from the side of the bridge and it has to be cut off with a grinder. Moreover, it is necessary to cut off in two places between the bracket and the silent block. Only after the bolt has been cut can the rod be removed from the bracket, and the remaining bolt head and nut knocked out.
Installation of jet thrust VAZ 2107
The second stage of replacing the VAZ 2107 jet thrust is the installation of a new one. First, rubber bushings lubricated with soapy water are pressed into the lugs of the thrust. Then metal bushings are inserted into them. Insert the rod into the brackets and fasten it with new bolts and nuts. If rubber and metal bushings are lubricated with soapy water, then it is better to treat threaded connections with lithol. Next time, this will make it easier to dismantle the traction.
This article will focus on the replacement of steering rods on the VAZ 2107, which leads to their untimely replacement and how to determine that it is time to change the rods.
Replacing steering rods with a VAZ 2107 is a process that you can do yourself without contacting a car service. Although this procedure is not elementary, which even a child can handle, nevertheless, having some auto repair skills, it is quite possible to cope with it on your own.
How to determine that the steering rods have become unusable
During operation vehicle suspension parts are subjected to excessive loads, as a result of which they subsequently become unusable and become unable to provide a safe and comfortable ride.
You can determine that some suspension parts have become unusable by the following signs:
- Suspension makes strange noises when moving;
- While driving on the highway, steering wheel shake is felt;
- Increased steering play;
- Uneven wear of rubber;
- The car pulls to the side when driving in a straight line.
If during the operation of the car you began to notice any of the signs listed above, then you must immediately diagnose the running system of the car, either on your own or by contacting a specialized service.
Steering trapezoid diagnostics
If you need to diagnose the suspension yourself, then for this we need an inspection hole or overpass. by the most ideal option is a lift, but not every motorist has such a luxury. We will consider suspension diagnostics using the example of a viewing hole.
So, we install the car on a viewing hole. To determine the malfunction of the steering rods, you need to know their device. Some motorists test it for beating by torsion and mistakenly think that it is not working. You need to check it for beating by moving it up and down. She should not hang out and make knocks.
Also, when diagnosing steering rods, pay attention to the bipod of the steering column pendulum. Since if it dangles, and you, without paying attention to it, mistakenly consider the steering tips to be faulty. We also pay attention to the bipod of the steering gear.
If during the diagnosis process it turned out that the suspension elements had become unusable, they must be replaced.
How to change tie rods yourself
If your car requires immediate replacement of steering rods, then you can change either one or both rods, in case of uniform wear. But it is still recommended to change the entire trapezoid at once, so that in the future it does not return to this issue.
To replace the trapezoid, we need the following:
- A set of necessary tools;
- Puller for ball bearings;
- New spare parts;
- A little patience and free time.
Before proceeding with the dismantling of the steering rod, you need to thoroughly clean it from dirt and, if necessary, apply WD-40 to the threaded connections in order to further facilitate your work. Then measure with a tape measure and fix the length of the lateral thrust on a piece of paper so as not to disturb the toe-in of the wheels. Carefully remove the cotter pin with pliers and twist the nut. Unscrew the fastening nut from the pin, which is attached to the bipod of the pendulum or steering gear.
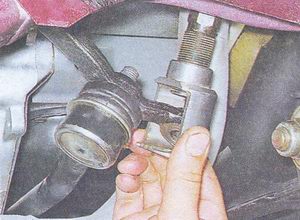
Then, using a special puller, we press out the fingers. If the puller we need is not available, you can use improvised means. To do this, we take a hammer and carefully, with clear and sharp movements, strike the eye of the lever knuckle(connection point of the tie rod pin). Having knocked out the finger from the eye, we do the same on the other side of the thrust. Having pressed out the fingers, the thrust is freely removed.
Before you start reassembling the suspension parts, make sure they are installed correctly. Traction differ among themselves: left and right. Do not forget to adjust the length of the rod before installing it. It should be the same as the dismantled one.
We unscrew the clamps and, depending on how long we need it, twist or unscrew the tip. Having set the length we need, set it in place and assemble in the reverse order.
When assembling, it is desirable to lubricate all threaded connections. Use nigrol to lubricate threaded connections. It is not necessary to lubricate the joints with lithol, as it is used only in closed joints. Nigrol is ideal for open joints, as it repels water well.
After replacing the steering rods with a VAZ 2107, it is best to contact the nearest car service to check the wheel alignment. No matter how hard you try to measure the traction by installing new ones, some misalignment of the wheels on the car will still appear.
Usage jet thrust in the suspension of a car improves the stability and controllability of the car when driving, especially on rough roads. On the move, the rear axle experiences heavy loads with different directivity vectors. Without jet rods or with damaged rods, the car begins to behave dangerously under heavy loads on the suspension. It is the jet thrust that prevents the car from rocking and does not allow it to tip over during a sharp maneuver. Their condition is critical to driving safety.
Therefore, the condition of jet thrusts should be periodically monitored and timely repair or replacement of these parts should be carried out.
Jet thrust malfunctions
The reactive thrust of the VAZ 2107, like any other car, takes on loads aimed at shifting or rocking the rear axle. If these parts fail, the behavior of the car on the road changes: handling deteriorates, increases braking distances and even there is a threat of a sudden change in the trajectory or overturning of the car. What factors cause breakage or wear of steering rods?
- Static loads. It is impossible to avoid this factor, but it is possible to reduce it without overloading the car.
- Torsional loads. They most often occur when hitting an obstacle. You can reduce them by slowing down in front of an obstacle.
- The chemical impact of water from chemicals that are sprinkled on roads in winter.
Therefore, it is important to regularly check the condition of the rods and timely detect deformation, chips and cracks. The appearance of such signs indicates the need to replace the part.
Rear traction VAZ 2107 have weak spots- welding seams with which the eyes are attached to the rod and silent blocks. The latter are made of rubber, which wears out much faster than metal rod parts. The wear of silent blocks contributes to the appearance of backlashes that prevent the rods from performing a stabilizing function. As for the breakdown of a welded joint, it can lead to the most disastrous results, up to an accident.
Malfunction of reactive thrusts is manifested in a characteristic knock in rear suspension during movement. Such a knock indicates the need for an immediate check of the condition of the rear suspension.
To eliminate defects in steering rods, as, in fact, to diagnose the suspension, you can contact the service station. But you should know that repairing and replacing these parts is a fairly simple operation that you can do on your own, even without much experience in auto repair work.
Consequences of malfunction of jet thrusts
As mentioned above, the breakdown of jet thrust has a bad effect on the handling and safety of the car. The body of the car loses stability, the trajectory of the movement becomes unstable.
Not too good aerodynamics of the “seven” complements the unstable behavior of the body, at high speed turning the car into a heavily controlled car. Therefore, you need to fix problems at the first sign of them, without waiting for parts to break.
Choice of jet rods
Depending on the manufacturer, the prices for VAZ 2107 jet thrusts differ several times. Regardless of the manufacturer, these parts are made of spring steels. Usually marriage can be identified even when buying. Before acquiring traction, it is necessary to inspect for the presence of chips and cracks, especially in the places of welding. It is better to buy them from a trusted store, and do not forget to take a sales receipt, which makes it possible to return the goods if the marriage does not appear immediately.
What is needed to replace jet rods VAZ 2107
If you decide to repair the VAZ 2107 jet rods, you will need:
- set of wrenches;
- metal brush;
- mounting blade;
- WD-40 tool to help unscrew rusted threaded connections.
Removing jet rods
Replacing jet rods VAZ 2107 consists of two stages: removal of old ones and installation of new ones. The traction is removed as follows:
Note: If the nut cannot be unscrewed, the bolt must be cut off.
- Using a mounting spatula, remove the jet thrust.
- If the bolt has been sheared, remove the remnants of the tie rod attachment.
Note: it is unacceptable to try to weld cracks on a cracked rod - the seam will not withstand the loads. Therefore, cracked rods must be replaced.
Repair and installation of jet thrusts
If the metal part of the rod is in good condition, they can be reused. It is only necessary to replace the rubber silent blocks. To do this, remove the old parts from the eyes and press in the new ones. Pressing can be facilitated by lubricating the surface with dish detergent (it does not corrode rubber).
The installation of new rods is carried out as follows:
- install the tie rod eye in the front bracket;
- lubricate the mounting bolt with nigrol or lithol, insert into the bracket and tighten with a nut;
- install the tie rod eye rear bracket;
- insert the fastening bolt, lubricated with nigrol or lithol, and tighten the nut.
Due to displacement rear axle holes in bracket and tie rod eye may not match. In this case, it is necessary to correct the position of the thrust using a mounting blade.
After installing the rods, it is necessary to fix the lower part of the rear shock absorber.
Removing the steering rods from the car VAZ 2107
1. We install a VAZ 2107 car on a viewing hole or overpass (see "Preparing a VAZ 2107 car for maintenance and repair").
2. We clean the nuts and tie rod covers from dirt.
3. Apply a penetrating lubricant to the threads of the tie rod ball joints.
4. Using pliers, remove the cotter pin of the nut securing the steering pin to the steering knuckle lever.
5. With a 22 mm open-end wrench, unscrew the nut securing the steering pin of the ball joint to the steering knuckle arm.
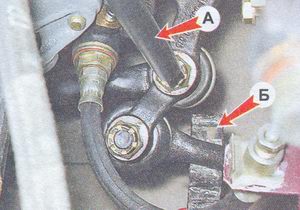
6. From above, from the engine compartment of the VAZ 2107 car, with a 22 mm socket wrench with an extension, unscrew the nuts (after removing the cotter pins) fastening the steering pins of the side rods to the pendulum lever (for the right steering rod) and to the steering gear arm (for the left steering rod).

7. With a puller, we press out the fingers of the steering tips and remove the side tie rods.
8. Before disassembling the lateral tie rod, measure and record its length. This is necessary in order not to change the existing wheel toe on the VAZ 2107 car during assembly. We loosen the bolts of the coupler clamps of the coupling and unscrew the steering tips.
Similarly, we remove and disassemble the other side tie rod.
9. To remove the middle tie rod, we unpin and unscrew the nuts with a 22 mm socket wrench with an extension from the engine compartment of the VAZ 2107.
10. If the pins of the joints of the side steering rods are disconnected from the pendulum lever and the bipod of the steering gear reducer, then with the help of a puller we press out the pins of the ball joints of the steering rod and remove the rod.
Attention
When performing the following operation (in order not to damage the thread), we unscrew the nuts until their ends coincide with the ends of the steering fingers.
11. If the side tie rods are not disconnected from the lugs of the bipod and the pendulum arm, then the fingers of the ball joints of the middle tie rod can be pressed out by knocking them out with a suitable rod A. First, we substitute the stop B under the inner tip of the side tie rod.
12. After pressing out the steering fingers, unscrew the nuts and remove the middle tie rod.
Installation of steering rods on a car VAZ 2107
1. We install the steering rods on the VAZ 2107 car in the reverse order. After assembling and adjusting the lateral tie rod along the length, we tighten the coupling clamps.
2. After installing the steering rods on a VAZ 2107 car, it is necessary to check and, if necessary, adjust the wheel alignment angles yourself (see "Wheel alignment angles on a VAZ 2107 car - camber, toe - adjustment") or in a specialized workshop.
I welcome you friends to the DIY car repair site. Reactive rods are important structural elements of a car's suspension. Their task is to provide overall rigidity, structural reliability and fixation of the rear axle.
Such products are always made of high-quality and high-strength metal. But due to constant longitudinal or lateral loads, exposure to water or chemicals from the road, as well as the action of twisting forces, the product may not withstand.
In this case, most often the reactive thrust bushings fail, which from time to time require replacement.
When to change jet thrust on a VAZ 2107?
As we mentioned, only high-quality metal is used in the manufacture of rods (as a rule, it is steel). The latter is able to withstand a huge load for many years of operation.
The “weak link” of the part is the lugs, which are not a continuation of the rods, but are only welded to them. It is no secret that welding has its own service life. Over time, the joints can be damaged or completely destroyed.
To eliminate problems in motion and prevent breakage of rods, it is necessary to inspect the condition of the part from time to time.
If traces of destruction, cracks, deformation and other malfunctions appear, the VAZ 2107 jet rods must be replaced.
Wherein Special attention give silent blocks - they often do not withstand loads and tear. As a result, the fixation of the rods deteriorates, they move relative to the base and cease to perform their functions.
In this case, do not wait until the rubber bands fail. If knocks appear during movement, inspection and detection of cracks on the rods, immediately change them. To do this, you do not need to go to the service station - you will do everything yourself, since it is not at all difficult.
Features of replacing jet rods: step by step
Before you change the jet thrust on the VAZ 2107, find a suitable place. Work must be done in a pit or overpass. In extreme cases, find a flat area, lift and fix the desired part of the car.
Prepare for work:
- required set of keys;
- metal brush;
- WD-40.
The jet thrust replacement algorithm is as follows:
1. Clean the tie rod joints with a special brush. After processing, be sure to spray bolted connection WD-40 and let it soak.
Note! That the process of replacing rods is identical, therefore, it makes no sense to describe how each rod changes individually.
2. It happens that you can’t unscrew it the first time. Re-process with a Vedash and wait a little more time.
For greater efficiency, you can take a wrench with a large “shoulder” and unscrew the nut (of course, if you are working lying under the machine, then this option is unlikely to work).
3. As soon as the nut is level with the edge of the bolt, apply a few blows with a hammer to move the bolt from its "familiar" place, since it usually sticks strongly in the sleeve.
4. Using a wrench, unscrew the nut completely and remove the bolt, if it does not give in, use a drift.
5. If the rod was torn out "alive", then you will have to get the remains of the fastener. This can be done with a small mounting spatula.
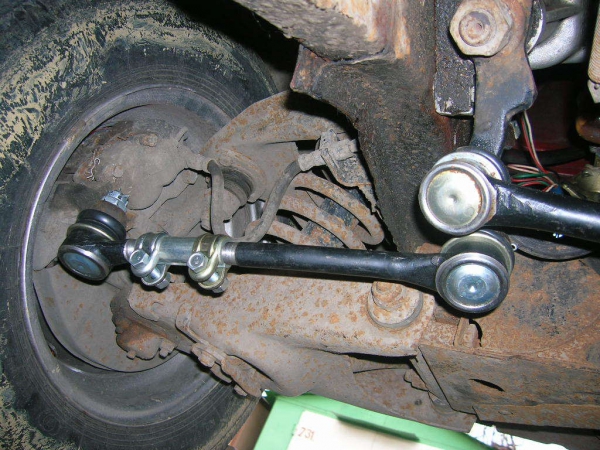
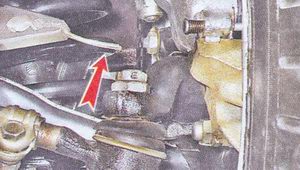
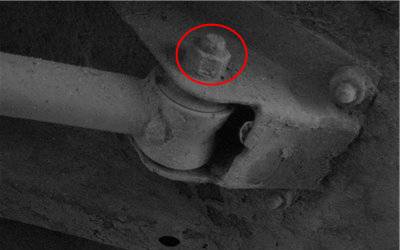
6. Now move on to the second part of the mount. Here you still have to unscrew the lower part of the shock absorber, pull out the spacer and take it to the side, this is done in order to gain access to the jet thrust bolt photo 1.
8. Nuts may be too tight - this is normal. This is explained by the fact that a self-locking nut is used for fastening. Its feature is the presence of a nylon "side" along the edge, which makes the connection more dense.
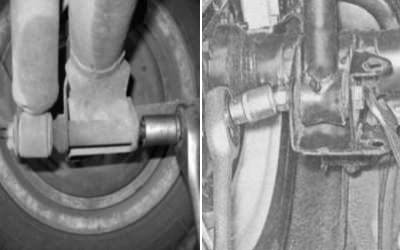
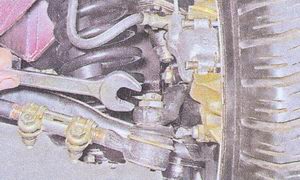
11. Further - more difficult. The design feature is such that the bolt is installed from the side of the gearbox. As a result, hitting the bolt is not very convenient - for this you need to unwind everything superfluous on the left side (remove the brake disc, remove the axle shaft, and so on).
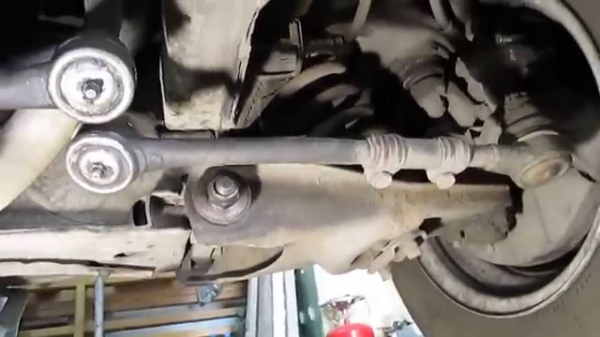
Of course, doing such work is a serious investment of time and effort, so there is no point in doing such work. Try to clean the connection with a brush, treat with WD-40 and then try to twist photo 2.
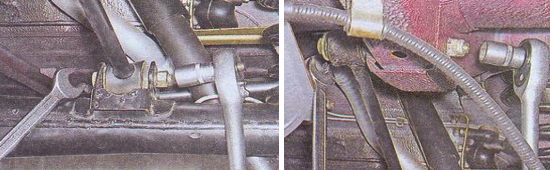
If nothing comes out again, then you can’t do without a grinder. Cut off the head of the bolt in the gap between the silent block and the bracket. Perform the same manipulation on the other side.
12. Using a mounting spatula, remove the rod from the bracket.
Please note that in the event of a crack or breakage of a jet thrust, do not weld it or try to restore it in another way - this is dangerous.
It is better to install a new traction and no longer worry about the possible failure of the node.
The thrust is set according to the following algorithm
1. Install the linkage first into the front bracket. Before inserting the bolt into the prepared place, be sure to lubricate it with nigrol.
2. Insert the torque arm into the rear bracket. Don't be surprised if the holes don't line up.
If the traction was broken, then under the influence of loads, the bridge constantly moved. This, in turn, led to a displacement of the mount.
To align the holes, you need to take the mounting blade, rest it on the bracket and unscrew the bridge until the holes are aligned. As soon as the holes of the openings are on the same level, insert the bolt and tighten the nut.
By simple manipulations, you can replace the jet thrust yourself and save some money on visiting the service station.
The main thing is not to miss the moment of traction or bushing failure. Good luck on the road and of course no breakdowns.