The transmission of torque to the drive wheel of the car from the gearbox is carried out through a constant velocity joint - CV joints. By appearance it resembles a grenade, which gave the node its name.
Maintain the unit in good condition, timely replacement of a grenade with a VAZ 2112, which has defects, is necessary for the reliable operation of the car and increasing its service life.
Two types of grenades are mounted on a VAZ 2112 car:
- Internal, which transmits torque from the transmission to the shaft.
- External, engaging with the wheel hub.
On a car, the outer element most often fails, therefore, in most cases, it is enough that only the replacement of the external VAZ 2112 grenade is completed.
The use of grenades in a VAZ 2112 car
They began to use grenades when transferring cars to front-wheel drive. If in such a design to use in driveline crosses, as in rear-wheel drive vehicles that have four needle bearings that work in pairs, equality of angular velocities on the drive and driven shafts will not be ensured.
So:
- The use of such a device will lead to an increase in the dimensions of the unit, the price becomes much higher, a strong pulsation occurs during the transmission of torque, which increases with an increase in the angle between the shafts.
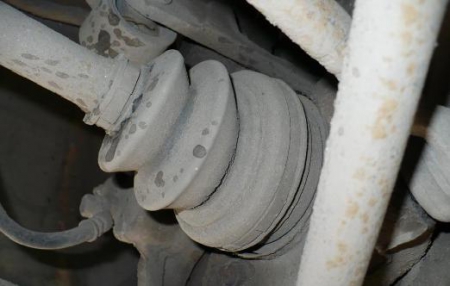
- The design of the grenades initially included the same resource as the entire car, but after the operation of the car, it was clear that its outer part was wearing out more. The use of a flexible, moisture- and frost-resistant material for the manufacture protects the surface of the grenade, but over time, external factors destroy the element and cannot be used for a long time.
- Rapid wear is explained by the action of permanent deformations, abrasive particles and moisture in large quantities. During operation or during repair, the anther may be damaged (see).
Cracks that appear on the protective rubber lead to the failure of the element. Damage to the shaft leading to the grenade must not be allowed, which can be seen when visual inspection details.
Replacing the external grenade of a VAZ 2112 car
The instruction for replacing a grenade with a VAZ 2112 indicates that the work is carried out with the part of the car raised and the wheel removed.
So:
- First you need to unscrew the hub nut.
- Remove crankcase protection.
- Release the ball joint from the connection with the lower control arm. If the support in the lever is pressed in, they are unscrewed at the same time.
- The ball joint is removed.
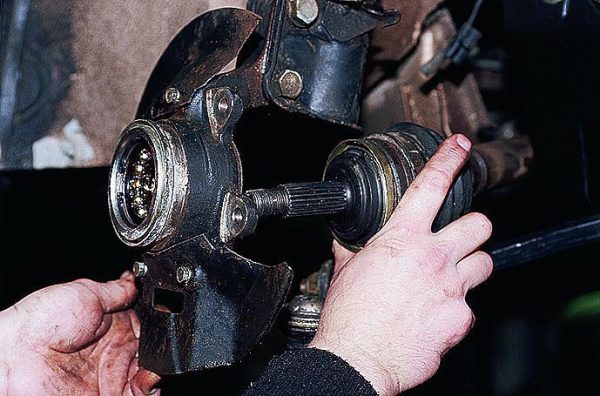
- To the side you need to take the rack, it will be in a bent position, and the splined shaft, which enters the hub through the bearing, will be located at an angle to the drive shaft. The latter connects the inner and outer grenades.
- The splined shaft of the grenade is knocked out of the bearing using a metal spacer from the outside of the wheel.
- It is removed from the grenade drive shaft.
- The duster is removed.
- Wipe off all the old grease. To facilitate the work, you can take WD-40 or another similar aerosol.
Tip: Replacing a grenade for a VAZ 2112 is carried out simultaneously with replacing the rings: thrust and lock. Inside the grenade is a retaining ring. The knot must be well lubricated with a large layer of grease.
- After installing the grenade on the drive shaft, before its final pressing, it is necessary to center the assembly in order to enter the fork without jamming.
- Installing a grenade seat.
- Crimping collars anther.
- Do-it-yourself assembly of the node is carried out in the reverse order.
How to replace the internal grenade
Replacing the internal VAZ 2112 grenade differs from the external one in that it needs to be done when all the oil has been drained from it.
Tip: You need to drain the oil from the gearbox on a raised vehicle. If its quality is low, it is better to replace the liquid so that in the near future you do not have to repeat all the operations again.
So:
- The wheel is taken off.
- The ball joint is unscrewed, which frees the rack from the lower arm.
- For free running of the outer grenade, you need to move the wheel to the side.
- It is necessary to knock out the outer grenade from the wheel.
- Both the outer and inner elements are removed from the gearbox.
Tip: The hole must be covered so that dirt does not get into the gearbox.
- In a vise, carefully so as not to damage the drive shaft is clamped.
- A screwdriver releases the clamp fixing the anther to the body of the internal grenade.
- The duster is removed. An element that has become unusable can be cut.
- Replacing a VAZ 2112 grenade is carried out by knocking the old one off the drive shaft.
- A new boot and grenade are put on the shaft.
Tip: A plastic plug is installed at the end of the shaft. The space inside the grenade must be liberally lubricated with grease.
- When mounting, make sure that the seat coincides with the direction of the drive.
- Change and put new rings - retaining and persistent.
- Graphite grease must be applied to the splined surfaces of the hinge.
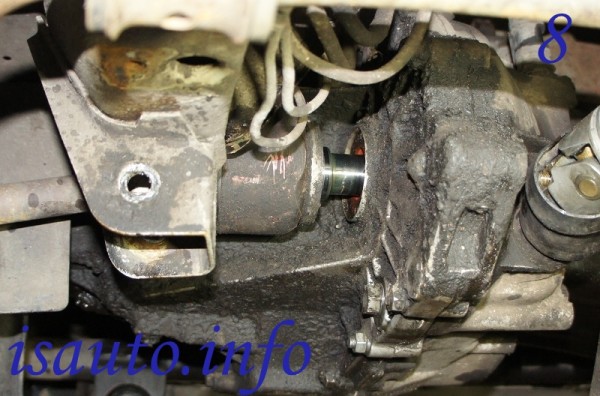
- The assembly is inserted into the gearbox, as shown in the photo.
Mounting the drive shaft
So:
- The shaft is finally fixed in the side gear.
- The drive shaft is installed in the wheel hub.
- Further assembly is carried out reversely to removal.
How to properly replace the internal grenade with a VAZ 2112 is clearly seen in the video. Timely replacement of the CV joint elements increases the life of the car in good condition.
For changing rear wheel drive vehicles Cars come with front wheel drive. In this regard, the crosses are replaced by hinges of equal angular velocities, which are called grenades.
This article is an instruction for replacing an internal grenade on a VAZ 2112 car and other cars from this family. Here you will find a video describing the process, as well as photos of some of the steps in the process.
So, let's begin:
- Causes of failure of the hinge of equal angular velocities
- Determining the need to replace the internal grenade
- Grenade Replacement
- Tool for the job
- Removing the axle shaft (wheel drive)
- Removal and installation of a new CV joint
- Installing the drive on the car
Causes of failure of the hinge of equal angular velocities
What can cause the failure of this element of the car:
- A poor-quality anther is the first reason and the most important. If the boot on the grenade is made of low-quality material, then it will quickly wear out, and any debris will begin to get inside the grenade.
- Loosening the anther collar also helps to get sand and dust inside the CV joint.
- Other defects in the anther (see), such as shearing the collar, tearing the anther or stretching it, also lead to bad consequences.
- Insufficient lubrication or, even worse, its absence in the CV joint body leads to rapid wear of the bearing and, as a result, wear of the entire part.
Advice! When repairing your car, especially if you have to crawl under the car, do not be lazy and pay attention to the condition of the anthers of the axle shafts. If you notice at least one of the defects listed above, replacing the CV joint with a VAZ 2112 is simply necessary!
Determining the need to replace the internal grenade
Before any repair, it is important to make sure that there is a malfunction.
And now we will do it with the SHRUS:
- Often, you can determine the malfunction by the outgoing sound from the suspected vehicle assembly.
- A hinge malfunction is determined while driving or starting off the vehicle.
- Of course, sounds can come from a faulty one, from a shock absorber strut, and from an engine. Let's learn how to determine what kind of sound should come from the CV joint and when it manifests itself.
- The sound of a faulty grenade is metal on metal, similar to crunching, breaking metal, or hitting a stone in a bearing or other undercarriage mechanism.
- When can this sound be heard? If such a sound appears on the turn, this means that you need to change the outer grenade, and not the inner one.
Advice! Although external grenades fail much more often than internal grenades, when repairing external grenades, be sure to check the others for operability. Also add lubricant if necessary.
- On the VAZ 2112, internal CV joints make a sound when driving straight, and especially when the car starts to move.
To more accurately determine the malfunction of the node, diagnostics should be carried out on the viewing hole.
The following describes how to do it yourself:
- The car is driven into a viewing hole. Under rear wheels necessarily put wheel chocks, and be sure to set the car to the parking brake.
- Next, you should raise the car with a jack so that one of the front wheels rises from the ground.
- Then turn the wheel by hand. When the wheel rotates, a sound appears - a malfunction in the internal grenade. If at the same time turn the wheel, then rotate, and only then does a sound appear - a malfunction in.
- After carrying out such an operation, it should be done on the second side (with the opposite wheel).
Now that the damage has been identified, you can begin to repair. Replacing the internal grenade with a VAZ 2112 begins!
Grenade Replacement
Tool for the job
What is needed in order to replace the VAZ 2112 CV joint as quickly and efficiently as possible:
- Sockets and spanners
- Head for 30 (missing in some sets)
- WD-40 or similar
- Hammer
- Collar - the longer the better
- pliers
- Jack
- Screwdriver
- Vise
- Gasoline and brush for cleaning surfaces
- Metal brush
- Nastavka (bronze, copper)
- Metal brush
- Can't do without a partner
- And, of course, a CV joint complete with lubricant (if not, then you should purchase it - the price is acceptable)
Removing the axle shaft (wheel drive)
So, we begin our repair:
- The first step is standard. We drive the car into the pit, put the wheel chocks, the car on the handbrake and neutral, pray (optional) and go!
- When it changes, oil must be drained from the crankcase of the variable gearbox! To do this, unscrew the desired plug, substitute the container for oil, wait for the end of the drain and screw the plug back.
- We remove the cap, if there is one, put a friend behind the wheel and ask him to press the brake hard.
- At this time, we take a head of 30 and a larger collar. Using this tool, unscrew the hub nut, which is located in the middle of the wheel.
- The tightening force of the nut is large, therefore, the longer the knob is, the easier it will be to unscrew it.
- After unscrewing the nut, the car should be raised with a jack. Raise the car, remove the wheel. Be sure to place a stand under the car in the form of, for example, hemp. Do not work on a car that is on a jack!
- We unscrew the wheel bolts and remove the wheel from the car.
- We twist the hub nut completely, remove the metal washer and spray the spline connection of the hub with the outer grenade with WD-40 rust cleaner.
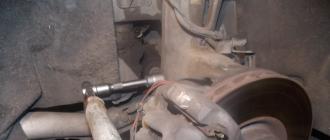
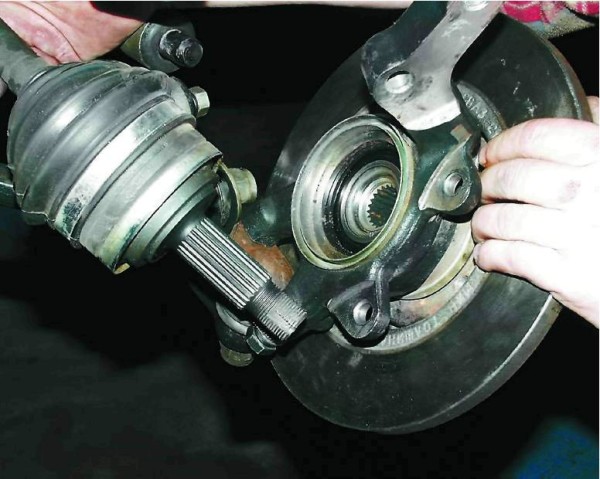
- In order to remove the axle shaft from the car, it is necessary to release the hub. Using the desired key or head, unscrew the two bolts securing the VAZ 2112 ball joint to the hub.
- After that, with the help of a bronze or copper tip, so as not to damage the thread on the outer grenade, we try to knock it (the grenade) out of engagement with the hub, adding a rust remover to make it easier to come out.
- When the parts are out of engagement, you can take the shock absorber strut to the side and remove the axle shaft (remember, you need to drain the oil, otherwise it will simply leak out onto the floor).
We got the VAZ 2112 half shaft, now we will start replacing the CV joint.
Removal and installation of a new CV joint
So:
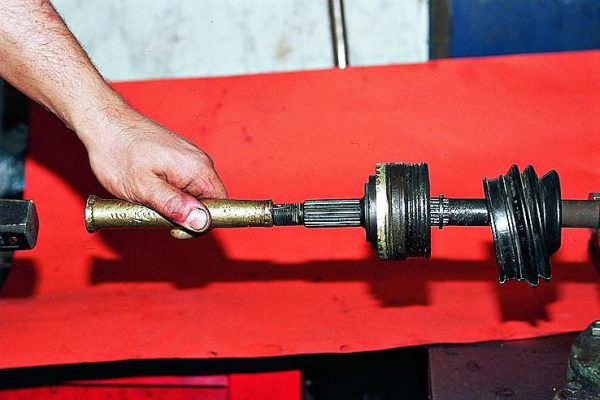
- The removed axle shaft must be clamped in a vise for convenience in further work.
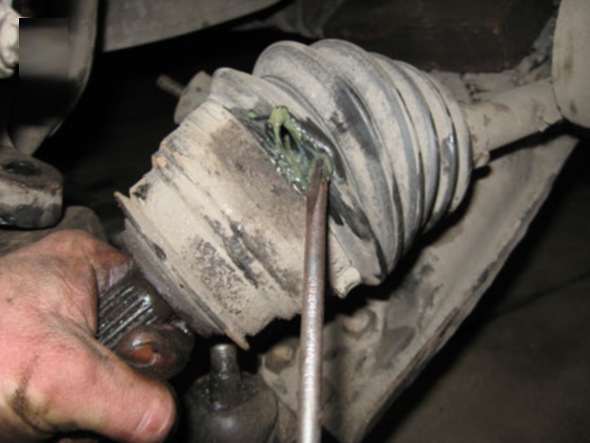
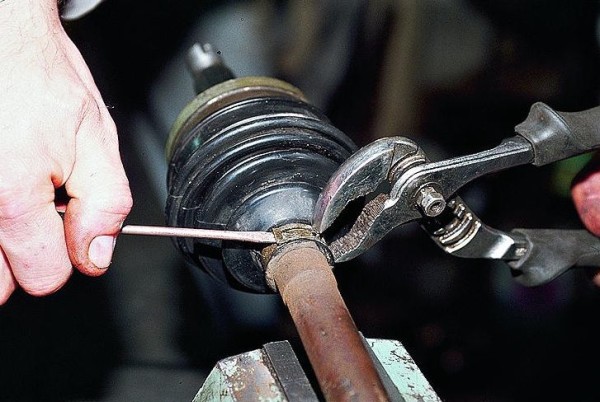
- Using a screwdriver and pliers, remove the boot. We unbend the two collars of the anther and tighten it onto the axle shaft.
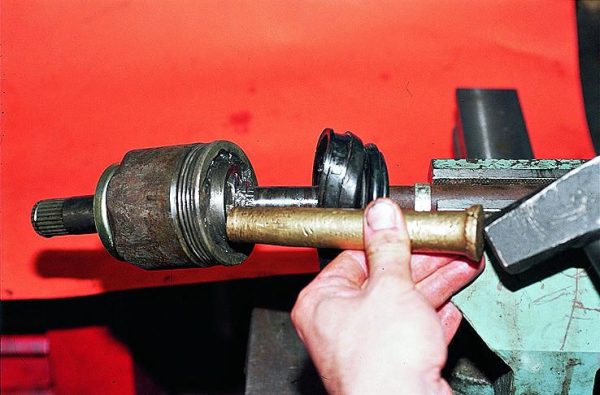
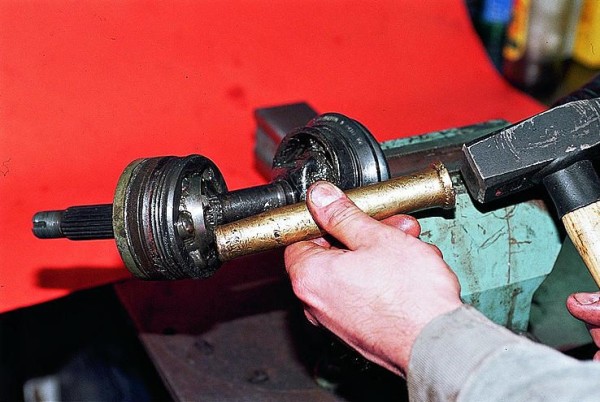
- Now, with the help of a guide and a hammer, you should knock the grenade off the axle shaft. The tip should be placed on the body of the grenade's internal bearing, and not on the body.
- After removing the grenade, you need to remove the old boot and put on a new one, if you plan. It is recommended to change the boot along with the grenade.
- Splined grooves on the axle shaft must be cleaned and preferably washed with gasoline. And then wipe it off.
- The required amount of new grease should be placed in a new grenade. The lubricant used is a special "CV joint", and not lithol or others!
- The grease is stuffed into the CV joint with a finger, rotating the bearing so that the grease is better distributed in the grenade body.
- After that, you can put the grenade on the axle shaft. The grenade is pointed at the spline connection and simply snaps into place with a sharp movement of the hand.
Now the axle shaft with a new CV joint is ready for installation on the VAZ 2112.
Installing the drive on the car
Now we do everything in reverse order:
- We insert the axle shaft into the gearbox housing, we get into the splined engagement in the box.
- We insert the slots into the hub.
- We fasten the two bolts securing the ball joint to the hub, thereby fixing the hub.
- We put on the washer and screw the hub nut onto the outer grenade and tighten it as far as possible.
- We put on the wheel, tighten the wheel bolts and lower the car onto the wheels.
- Now you should stretch the wheel bolts, and also tighten the central nut with a head by 30.
- This will again require the help of a partner pressing the brake pedal.
- Don't forget to add oil to the gearbox.
- After pouring oil into the gearbox housing, check for oil leakage at the junction of the inner CV joint with the gearbox.
If necessary, repair the second axle shaft in the same way, replacing the grenades that have failed.
Keep track of the condition of your car and then it will be a pleasure to drive not only for you, but also for passengers. And most importantly, from technical condition any part of the car can even depend on your life! Good luck on the roads!
On vehicles with front-wheel drive, instead of cardan shaft with crosses, constant velocity joints (CV joints) with half shafts are used. Like crosses, CV joints have a tendency to fail.
This article discusses in detail: the replacement of the external grenade VAZ 2112, visual photos for a better understanding of the process and good advice from the auto repair shop.
- Why does the CV joint fail? Principle and working conditions
- How to determine the malfunction of the hinge? Diagnostics
- What will be needed?
- Replacement
- Removing the half shaft
- Grenade Replacement
- Installing the axle shaft on the car
Why does the CV joint fail? Principle and working conditions
So:
- The wheel of a car is its dirtiest part. The wheel is constantly in contact with the road, and the road is not always paved, but often unpaved or sandy.
- usually wears out much faster than the inside, as it is closer to the wheel and is more prone to overload when driving on uneven surfaces.
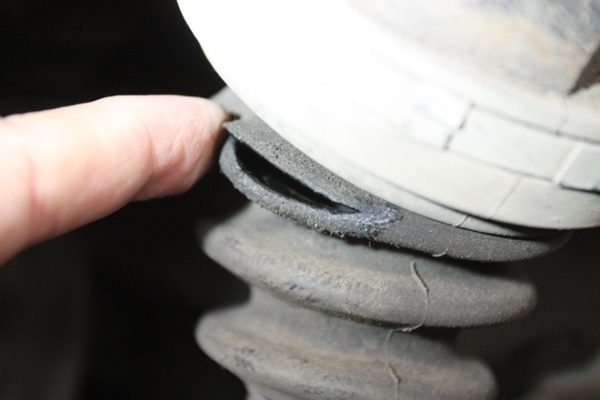
- Anther break. One of the reasons for the failure of a grenade is a violation of the integrity of the anther. Usually this happens due to a torn boot clamp, a cut of its fastening, or a cut in the boot itself.
- It also happens that the boot loses its rubber properties over time and stretches. Then it does not fit snugly to the axle shaft.
- For all these reasons, dust gets inside the outer CV joint, and even worse, sand and dirt.
- From the ingress of harmful substances into the grenade, the bearing fails - collapses or jams.
If you notice a torn grenade boot, this means that on the VAZ 2112, replacing the CV joint is simply necessary for its further safe operation.
How to determine the malfunction of the hinge? Diagnostics
At any service station, before repair, they perform diagnostics of the unit that is going to be repaired.
Let's do it ourselves:
- While driving your favorite car, some extraneous sounds? One option could be a faulty CV joint.
- Most often, a CV joint requiring repair manifests itself in corners (not necessarily sharp). When turning the car from the side of the hood, a sound similar to metal jamming, the sound of metal breaking, the grinding of metal on metal comes out.
- If such sounds appear already when driving straight, then the CV joint should definitely change!
Advice! Do not disregard the sounds that arise during the operation of the car. In some cases, this can cost the life of the driver and passengers.
- After the appearance of sounds similar to a malfunction of a grenade, it is necessary to diagnose the front chassis of the car in a pit or overpass, in extreme cases, just in the garage.
- To do this, you need to raise the car with a jack. Raise the side from which the sound was heard. Don't forget to put wheel chocks under the rear wheels of the car.
- When the wheel is free to rotate, you should rotate it around its axis and listen for the presence of sound. If the sound does not appear, then you should turn the wheel in the direction of the turn at which it arose.
- When a sound appears, it will become clear that it is faulty and needs to be replaced as soon as possible.
- If the sound still does not appear, then check the other side (the other wheel) in the same way. By the way, if the sound appears, then check anyway - you may have to change both grenades.
After diagnosing the constant velocity joints, you can begin to replace them.
What will be needed?
Here is a short list of what will be needed for the grenade to be replaced on the VAZ 2112:
- Partner
- A set of heads or ring wrenches (you still have to find a head for 30)
- Rust cleaner (WD-40 or equivalent)
![]()
- Long collar
- Pre-purchased CV joint (average price) and lubricant for it (usually included)
- Hammer
- pliers
- Flat screwdriver
- Vise
- Petrol
- Brush (regular paint brush will do)
- rags
- Copper or bronze trim
- Metal brush
In some cases, you may also need the following:
- Container for oil
- Plug in the checkpoint
- Watering can
Replacement
After all the preparations, you can begin the process of replacing grenades with a VAZ 2112.
Removing the half shaft
So:
- Perhaps this is the most interesting in the process.
- Install the car on a flat area, a viewing hole. Install wheel chocks.
- First, remove the cap from the wheel, if you have one.
- Now you need the help of a partner. He should take a position behind the wheel and press hard on the brake pedal.
- In this case, you should take a head for 30 (in some cases 27 or 32) and a large collar. The head is put on the hub nut, which fastens the grenade to the hub (located in the middle of the wheel) and unscrew it with a large knob.
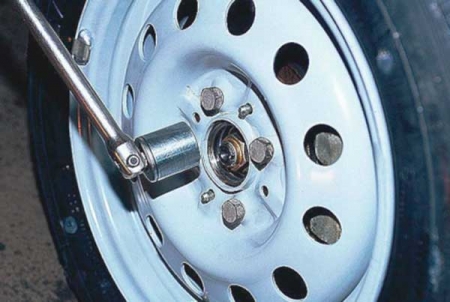
Advice! To complete the last stage described, it will take a lot of effort. Therefore, the longer the knob you take, the easier it will be to unscrew the nut.
- Then you can unscrew the wheel bolts and remove the wheel.
- Spray the splined surface of the hinge with a rust cleaner. Most often, you need an additional tool - you just can’t knock it out.
- When the wheel is removed, it is necessary to release the hub from. To do this, take a suitable head and unscrew the two bolts securing the ball joint to the wheel hub.
- When the hub is freed from the ball joint, you can try to remove the splined surface of the grenade from the hub. Remove the entire hub nut and metal washer.
- Now you need to take a copper (bronze) tip and a hammer, and with their help we knock out the splines from the engagement. If necessary, add more WD.
- When the splines are out of engagement, we take the rack to the side and remove the axle shaft from the hub.

Advice! During operation, make sure that internal grenade did not jump out of the gearbox crankcase - this is an extra loss of oil.
Grenade Replacement
Two methods will be considered:
- We remove the anther from the grenade. To do this, with the help of pliers, we bite the fastening clamp and, prying with a screwdriver, remove the boot from one side. Turn it out so that it does not interfere with further work.
- Now again you need the help of a partner. He needs to firmly hold the axle shaft so that it does not jump out of the checkpoint.
It is recommended to rest the axle shaft against something (usually either a lever or an anti-roll bar). - The outer grenade must be turned with the splines up. Thus, there is access to the internal bearing of the grenade.
- It is necessary to set a copper adapter on the inner bearing and knock down the grenade with hammer blows. When knocking down, the axle shaft must be rotated so that the bearing comes off evenly and does not jam.
- After the outer CV joint is removed, you can proceed to install a new one.
Note! The above is Perfect option removal of the CV joint. And then it will be told about how it happens MOST OF ALL.
- After removing the grenade from the hub, the axle shaft is removed - it is pulled out of the gearbox housing. A container is placed under the jet of oil from the box so that the oil does not have to be drained. Ideally, a special plastic plug is inserted into the gearbox hole.
- The axle shaft is clamped in a vise for the convenience of further work.
- The boot is removed from the grenade, but remains fixed on the axle shaft. It turns inside out so as not to interfere. If it is planned to replace the anther, then it is either cut off immediately or removed after removing the grenade.
- We remove the grenade in the same way as above. We hit the bearing with a tip and a hammer, and it comes off the axle shaft.
- If we change a grenade, then we change it. If, for example, we change only a torn anther, then we do the following.
- The anther is removed and a new one is put on the axle shaft.
- The grenade is thoroughly washed with a brush in gasoline, and then wiped off. After that, it is necessary to fill there with special grease for CV joints.
- If a new grenade is installed, then do not forget to stuff enough grease into it too and evenly distribute it there by turning the bearing.
Advice! Before installing the grenade on the axle shaft, pay attention to the condition of the retaining rings. Replace if necessary.
- A new or refurbished grenade is much easier to install on the axle shaft than it is removed. One sharp blow with a hammer through the tip and the grenade is in place. Experienced locksmiths can even put on a grenade with their hand.
- Next, you need to put the boot on the seat in the grenade and secure it with clamps.
There are special clamps for grenades (do not use plastic ones). Metal clamps are installed using pliers and a screwdriver.
Advice! Clean the spline connection, both on the grenade and in the hub, with a metal brush and lubricate.
Now the VAZ 2112 axle shaft with a changed external constant velocity joint is ready for installation on a car!
Installing the axle shaft on the car
So:
- The axle shaft is inserted into the crankcase. Its other end is inserted into the hub until it stops.
- Next, you need to attach the ball joint back.
- Don't forget to put the metal washer back on and tighten the nut that secures the grenade to the hub.
- Reinstall the vehicle wheel and lower the vehicle from the jack onto the wheels.
- Again, the partner must apply the brakes as hard as possible. You take a wrench and a head, and tighten the nut with good effort!
- Next, tighten the nut. This is done with a hammer and a blunt chisel. This is done so that the nut does not unwind.
Here, in principle, is the whole replacement. If something is not clear in the text, remember that you can always watch a visual video that will show it all live.