Quite often, it is required to replace the door lock cylinder with a VAZ 2109. This is not a very reliable part, it wears out relatively quickly. At the same time, it makes no sense to repair the larva, it is disposable. It is much easier to immediately put a new one in and forget about it for a while. The replacement job is pretty easy. Do not waste time and money on a trip to the service. Replacement can be done in just a couple of hours.
In addition, you will be guaranteed to know what is done and how. And if problems arise in the future, quickly restore the lock to working capacity. Some working moments may seem tedious, but in general, you will cope with the repair without any problems.
Causes of failure
Replacing the door lock cylinder on the VAZ 2109 performed in the event of a malfunction. We list the most common reasons:
- Key loss;
- The retainer fell off, securing the lock itself to the rod connecting it to the central lock;
- Breakage specifically larvae. Due to the design features, it cannot be repaired, only replaced;
- Wire breakage.
Tools
The work of replacing the larva is not difficult, but quite a lot of tools will be required. So, you will need:
- impact screwdriver;
- Slotted screwdriver;
- Phillips screwdriver;
- Key-pipe for 8;
- pliers;
- Hammer;
- Ratchet.
Replacement
We are talking here about the lock of the front door on the VAZ 2109. It should be noted that the back door (cracker) has a similar larva. And this instruction can be used, including for her. Work is done in the following order:
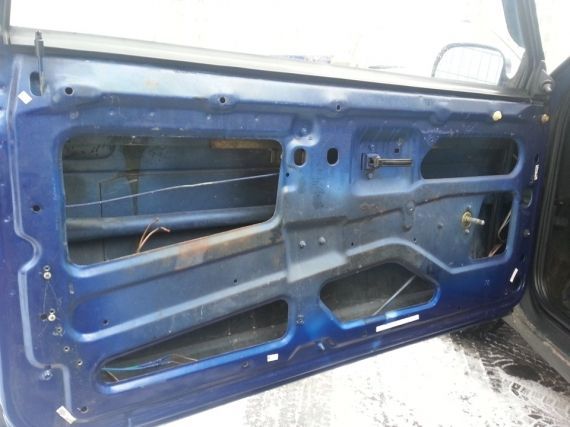
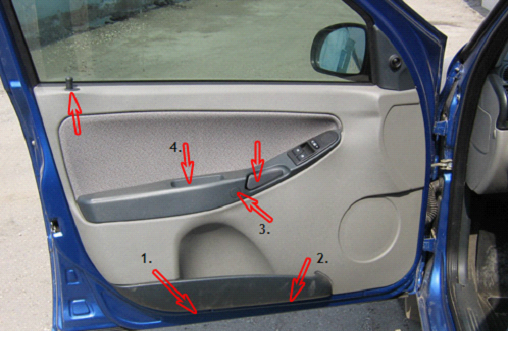
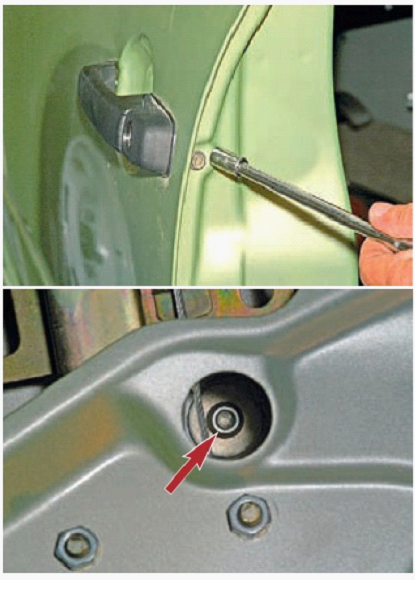
- We remove the decorative trim from the doors. This must be done carefully, do not forget that it must be installed in place after completion of work;
- Raise the glass all the way. If it is omitted, then you will have more problems in the process of work;
- The seal located at the bottom is squeezed out with a screwdriver. Be careful, a slipped screwdriver can cause injury;
- The spring clips are removed. One is at the bottom and 3 are at the top;
- The protective film is removed;
- Next, we disconnect the rod from the handle key switch (external) from the inside;
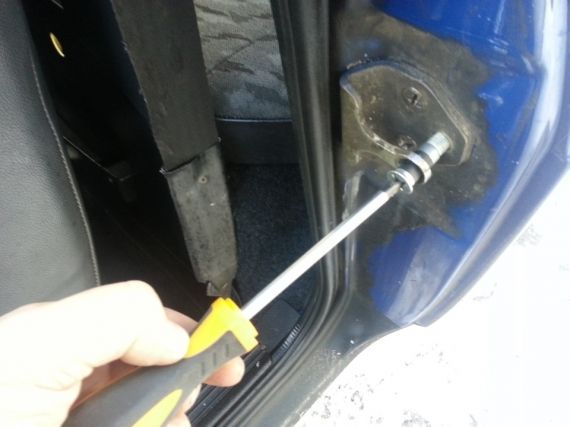
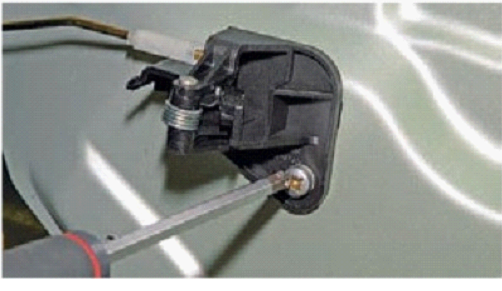
- Unscrew the bolts that secure the lock. There are some peculiarities here. At the factory, they are attached to the sealant, in connection with this, it is better to use an impact screwdriver. This will allow you to unscrew them quickly and without much strain;
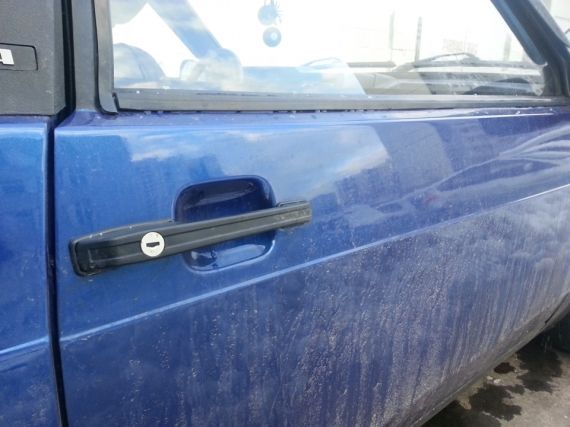
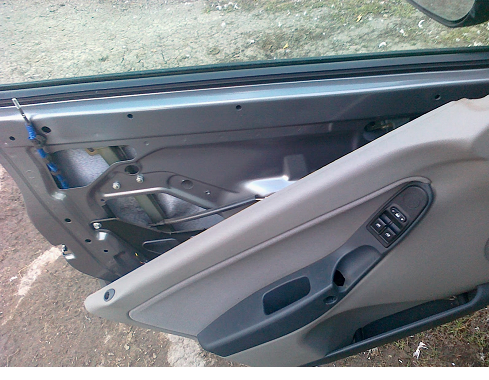
- The outer lock is removed along with the handle. This is done using a tube wrench, which unscrews the fastening nuts. Next, the inner handle is unscrewed, for this, 2 screws are unscrewed with a Phillips screwdriver. Make sure that the handle does not fall into the door.
- To do this, it is desirable to hold it. The removed handle is checked for damage;
- The outer part of the handle is pushed inward, after which it will be possible to pull it in together with the main locking mechanism;
- The rubber retainer is removed from the end of the rod. It is best to do this with pliers, but often it can be done even with your hands. The handle is removed from the rod, for this it is turned;
- The internal thrust on the lock is held by a locking clip, it is hooked with a screwdriver and pulled out. Then the traction is removed;
- The holder of the thrust, which is intended for blocking, is rotated, and it is removed. The fasteners holding the lock from the outside are unscrewed;
- The handle is removed;
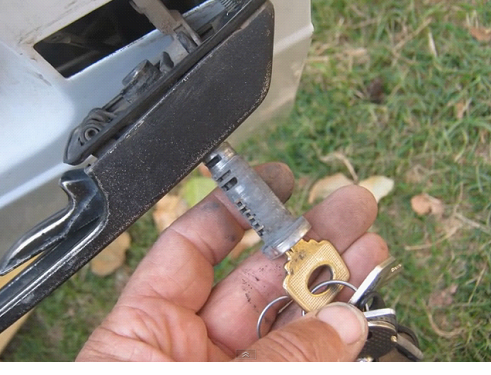
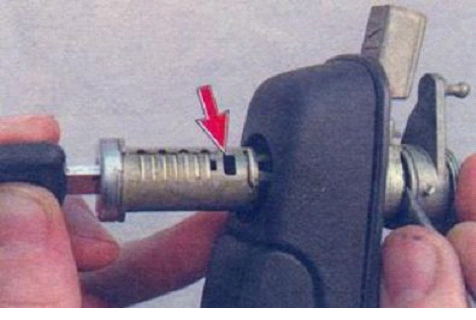
- Now we replace the larva itself. To do this, with the help of an awl, the locking pin holding the leash is pulled out;
- The leash is removed;
- Hook the spring of the larva and remove it. The easiest way to do this is with a thin screwdriver;
- The key is inserted and the larva is removed;
- Assembly is carried out in reverse order.
Possible problems
Sometimes, after installing a new lock on the VAZ 2109, the door may not close. The reason is the errors made during assembly. Most often, they forget to put on the lock rod. In this situation, the lock simply will not open. Remove the lock, and install the rod in place.
You may also need to adjust the lock. This is done with a latch. It is weakened and the lock is moved in the right direction, achieving optimal performance. Sometimes you have to lengthen or shorten the rod. Your task is to choose its length as optimally as possible.
Conclusion. If all stages of work are carried out carefully and correctly, then you will not experience any difficulties. Replacing the door lock cylinder with a VAZ 2109 in this case will happen quickly enough. Having done this work, you can repeat it much faster. Most best option install new parts. Otherwise, soon you will have to disassemble the door again.
It is known that the locks for car doors VAZ-1118 have an interesting property - you can replace their larva without removing the mechanism from the door itself. On previous models, dismantling is more difficult: you need to squeeze out the bracket holding the larva with a paper clip or an awl, while falling into the hole on the mechanical drive. In the Kalina model, that is, the VAZ-1118, this bracket is pressed by pressing with a ruler or a screwdriver. Which, in turn, is produced on the installed lock (it makes no sense to remove it). Next, the replacement operation is discussed in more detail.
The device of VAZ-2109 locks and disadvantages
The lock cylinder is a cylinder that is equipped with a secret mechanism. In all locks with a flat key, the larva is made interchangeable. For example, on VAZ-2109 cars, it is replaced like this.
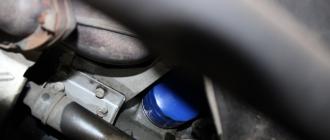
Door mechanism VAZ-2109
The rotating part, which is connected to the rod, is called the "drive". In this drive, as you can see, a hole is provided for dismantling the larva. After pressing with a thin axis or an awl, the larva is pulled out.
 Actions after pressing the fastener
The only drawback remains - it is hardly possible to follow the steps indicated here without removing the lock completely before that.
It should be noted that even when the mechanism is removed, it will not be easy to pull the larva out of it.
Therefore, before dismantling, be sure to insert the key into the cylinder and turn it to the left or right by 90 degrees. The purpose of this action is to be able to dismantle the larva. The specified action is performed effortlessly, and then the key is simply pulled “towards itself”.
Replacing the larva in Kalina
First of all, replacing the elements of the lock means that the door trim will be completely absent. Therefore, first we will figure out how to dismantle the skin in Lada Kalina cars. The second chapter is devoted to how to remove the larva and install a new one in its place. The last of the actions, in fact, will be the simplest.
Removing the door trim
The casing is fastened not only on screws, but also on plastic caps. The number of screws holding the part in question is four:
 Front door trim 1118
 The numbers here mark all the fastening elements. But to get to them, it is necessary to remove the cap of the screw “3”, as well as the inner door handle. The handle of the "dog" also needs to be unscrewed.
If these actions are completed successfully, the skin begins to be dismantled, moving it away from the metal. Dismantling is carried out starting from any of the corners, but care must be taken: the caps holding the plastic are fragile.
 How to remove plastic trim
 If there are power windows in the package, it will be necessary to disconnect the connector connected to the button block. And yet, another similar connector is present in most configurations - where there is a central lock. Both connectors must be disconnected.
All steps described here involve electronics anyway.
Therefore, at the stage before dismantling the skin, you need to open the hood, take the “10” key and unscrew the fastening of the negative terminal. We are talking about the battery terminal, which can be connected last (when the last screw is wrapped). Whoever breaks this rule will look for blown fuses. Make a conclusion.
How to get to the door mechanism
lock mechanism
The rotating part with the protrusion is called the “drive”, and it will just be needed next.
Replacing the larva will be easy:
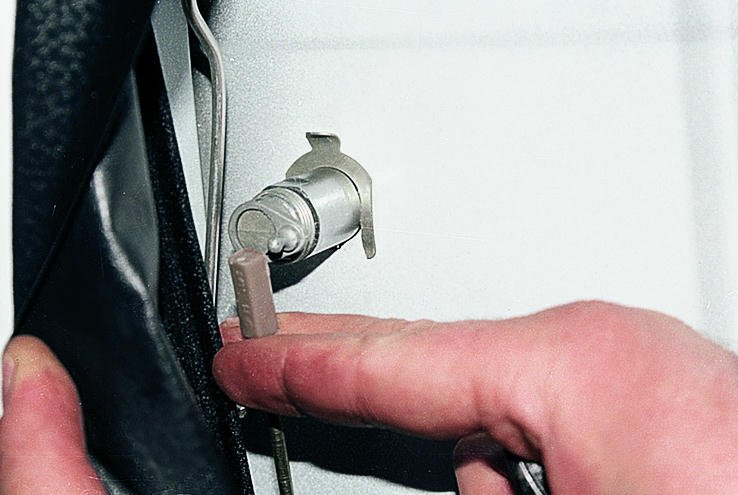
- The key in the cylinder, currently fixed in the door, is turned 90 degrees;
- With a steel ruler, a knife or a thin screwdriver, you need to press on the locking tab located opposite the slot in the body of the larva. It is necessary to bring a screwdriver between the rotating and stationary part of the mechanism. Be aware that the slot in the driver's door is made from below (looks "to the floor"), in the passenger doors - from above!
- Pulling the key towards you, the larva is pulled out;
- The new larva is installed as follows: with the key inserted, it is pushed into the lock until it stops. In this case, the latch tongue will need to be drowned inward.
The next photo illustrates the "second step".
 Notch above locking tongue
 The slot itself, when the mechanism is assembled, is located between the drive and the lock body (at least it is provided for). In the space between these parts you need to manage to squeeze a screwdriver. Sometimes the indicated action does not lead to a positive result, and then the lock has to be removed as an assembly.
Let us turn again to the “Behind the Wheel” review, which discusses how to remove door locks in the Kalina VAZ-1118. If the skin has been dismantled - that's good. Next, according to the recommendations, unscrew the screw securing the inner handle:
 Here is the door handle
 Two rods made in the form of rods go to the lock mechanism. Both of them are dismantled by disconnecting the plastic clips:
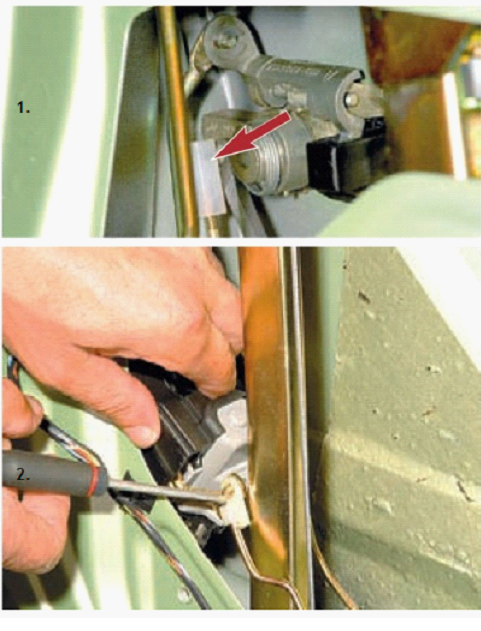 Disconnect the rods from the lock
 To disengage the latch, press on the plastic tab with a screwdriver.
At the last step, as you might guess, it remains to unscrew the screws holding the mechanism motionless.
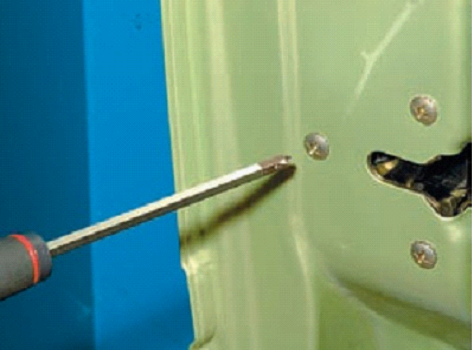 Three screws, cross head
 But first, you need to dismantle the external handle. For what, two bolts are unscrewed, equipped with an “8” hexagonal head.
 Two bolts hold the handle
 By the way, if the central lock connector is fixed on the mechanism module, it is also turned off.
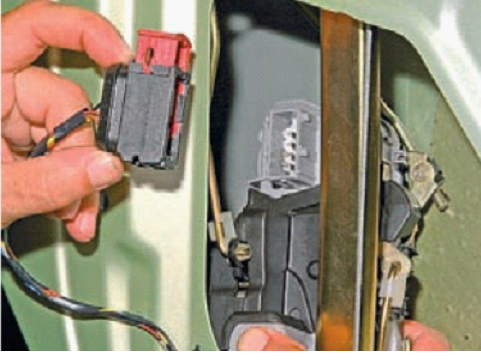 Central lock connector built into the module
 Let the harness with the wires of the central locking drive remain in the door.
Of course, all locks in the doors must be unlocked with one key, which is supposed to be used in the future.
The work indicated here is carried out on each of the four doors. In addition, it is highly desirable that the ignition key also unlock the doors. However, replacing the larva on the steering column will not be so easy. Can you handle the amount of work that needs to be done in total? Decide for yourself.
Independent change of the secret code
Many owners of VAZ 2109 cars must have encountered a problem when, after trying to open a frozen door, the lock simply turns and does not open. In this case, the lock cylinder can come out with the key from the socket of the handle. This problem is most often caused by the destruction of the hundred *** ring and the loss of the fixing column located in the plastic cap of the thrust. If the door remains in the locked state, the repair will become more difficult, because the door trim will be more difficult to remove. If the car is used for a long time, it is recommended to inspect the door locks from time to time and replace the part if necessary. Often, when a repair is required, it turns out that severe wear of the part leads to the need to replace the element. You can try to restore the castle, however, such repairs will help for a short time and after a while you will have to return to solving this problem again.
Replacing the door lock cylinder on the VAZ 2109
On the VAZ 2109, replacing the door lock cylinder is a fairly simple job that you can do on your own, having free time and essential tool. If the lock larva is out of order, there is no point in repairing it, because after a while the breakdown will happen again. This spare part is inexpensive, so it is not recommended to save on replacement. You can find such a part in almost any specialized store that sells auto parts for VAZ cars. The design of the lock installed at the rear of the car is practically the same as the lock of the front door. It is important to perform the replacement following the algorithm described below.
Replacing the door lock cylinder on the VAZ 2109 should begin with the removal of the entire decorative door trim. Having disconnected the lock switch rod, remove the opening handles. The mechanism is on the inside of the door. Then you can proceed to work with the front side, on which we unscrew the fixing screws of the mechanism and remove the lock. After that, unscrew the screws securing the inner handle. After completing this step, you can easily push the handle inward. After dismantling the inner element, remove the rubber holder and disconnect the rod from the handle.
In order for the VAZ 2109 to replace the door lock cylinder correctly, remove the hundred *** ring and disconnect the inner handle rod from the lock mechanism. We bend the holder, which serves as a latch made of plastic. This will allow you to disconnect the button rod responsible for locking the lock. This completes the process of removing the old element. If it is not planned to install a new spare part, it is recommended to wash each part in kerosene and check for mechanical damage on the elements. Special attention it is worth paying attention to deformed levers and insufficiently strong rivet joints. If the mechanism turned out to be serviceable, before reassembly, we lubricate the parts with grease and proceed to further disassembly.
Having removed the outer handle with an eight socket, carefully check the condition of the handle. Carefully inspect the threaded fastening studs to identify mechanical damage. If defects are found, it is worth replacing the handle. The last stage of dismantling is to remove the lock cylinder. To do this, remove the plastic latch pull ring and dismantle the hundred *** ring. We insert the key into the lock and pull the mechanism out of the handle. This is how easy it is to replace the door lock cylinder on the VAZ 2109. The elements are assembled in the reverse order. It is important to remember that parts that cannot be replaced must be changed without fail.
If the car door is difficult to open and close and the door hinges are adjusted correctly, the door lock needs to be adjusted or replaced. This does not require any specialized tools and devices. You can replace or repair the VAZ 2107 door lock yourself.
Repair of the door lock VAZ 2107
If the door lock does not work well, it is not necessary to change it. It is likely that you can get by with lubrication and adjustment.
If the door lock mechanism is working properly, the lock latch needs to be adjusted. If the door sags down when closing, the latch must be raised; if it rises, lower it. If the door rests too much against the seal and closes “with one click”, the latch must be pulled out, if the door dangles, move the latch deeper towards the passenger compartment. The procedure is as follows:
- Mark the initial position of the latch with a marker.
- Loosen the three fixing screws.
- Move the latch to a position where the door closes easily and securely.
- Tighten the mounting bolts.
- Check the operation of the door lock. If necessary, correct the setting.
To repair the door locks, you must first remove the trim.
If the door does not open well with the inner handle, it is necessary to adjust its position, which affects the tension of the rod. For adjustment, it is necessary to loosen the two fastening screws and move the handle together with the bracket to a position in which the lock works correctly. After completing the adjustment, carefully tighten the bolts.
Another cause of problems with the VAZ 2107 door locks is plastic external handles installed instead of metal ones. The material of such handles deforms over time and loses its rigidity. To fix the problem, it is necessary to replace the handles with metal ones.
Castle repair back door VAZ 2107 does not differ from the front. The only difference is the presence of "larvae" in the front locks and rods attached to them, which sometimes causes additional problems when locking the lock with a key.
Replacing the door lock VAZ 2107
Sometimes, to restore the lock to working capacity, it is enough to clean and lubricate its parts. Otherwise, it is necessary to replace it with a new one. The door lock is installed in the reverse order. Before installing the lock, its parts must be lubricated with grease.